|
SpinCore PulseBlasterDDS-IV-1000
Compilation with Microsoft Visual C++
|
1 Introduction
This document is designed to walk one through the
process of configuring Microsoft Visual C++ to compile
C code based on the SpinCore PulseBlasterDDS-IV API.
It details the process of adding the proper include
and library paths, as well as the required library
dependency. Microsoft Visual C++ 2010 SP1 Express was
used for generating the instructions and images. The
directions should apply to older or newer versions of
Visual C++, with minor differences.
2 Create Project
- Open Microsoft Visual C++
- Select “File > New >
Project...”
- Select “Win32 Console
Application.”
- Specify your project name and
location.

| Figure
1: New Project Wizard |
2.1
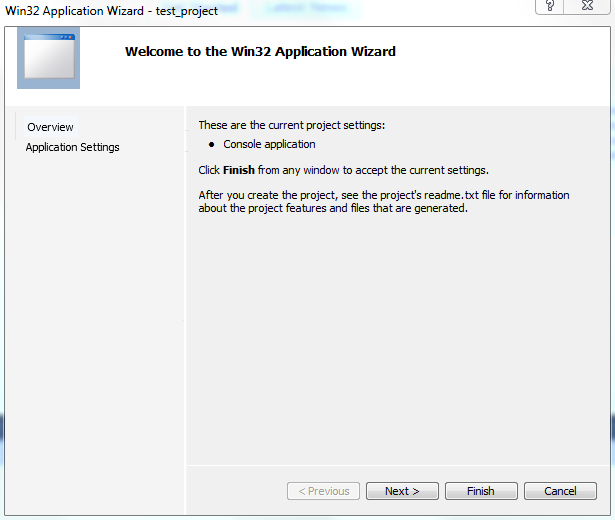
Please click “Next” on this page.

| Figure
2: Win32 Application Wizard Page 1 |
2.2
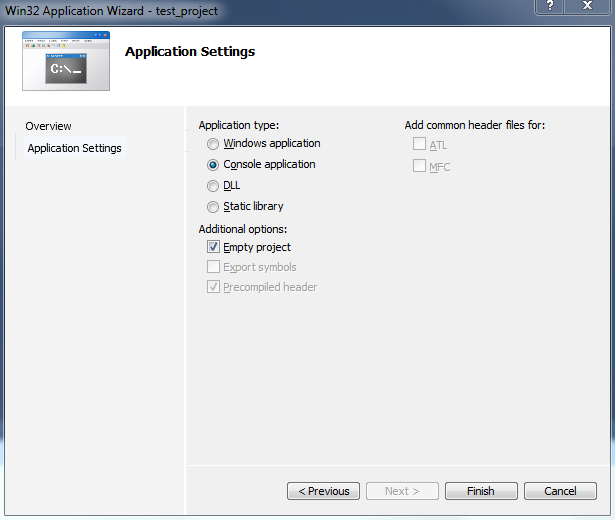
- Click the “Console
application” radio button.
- Select “Empty project” under
additional options. An empty project will be used
for this guide since the source code is already
written, and will be copied to the project
directory. You may opt to not create a blank project
if you wish to write new code based on the initial
files Visual C++ will generate.
- Click finish.

| Figure
3: Win32 Application Wizard Page 2 |
3 Configure Project
3.1 Adding Source Files
- Copy your source file into
the project directory, and select “Project > Add
Existing Item...”
- Select your source file
located in the project directory, and click “Add.”
For this example, the
“pbddsiv_read_firmware_example.c” example program
was used. The figure below shows what your “Solution
Explorer” pane should display after adding the file.

| Figure
4: Visual C++ Main Window, after source
file is added. |
3.2 Adding Include Paths
First we will configure Visual C++ so that it will
find “ddsivapi.h”.
- Go to “Project >
Properties”.
- In the upper left corner of
the “Property Pages.” window, please select “All
Configurations” in the “Configuration:” drop-down
menu.
- In the left pane select
“Configuration Properties > C/C++ > General.”
- In the main view, add the
path where “ddsivapi.h” is located
to the “Additional Include Directories” property. In
this case it is located in
“C:\SpinCore\PBDDSIV\inc”.
- Click “Apply.”

| Figure
5: Visual C++ Property Pages |
3.3 Adding Library Paths
Next we will add the library search path for
“pbddsiv.lib”. The Property Pages should still be open
from the previous step.
- Please navigate to
“Configuration Properties > Linker > General”
in the left panel.
- Now add the path to the
library to the “Additional Library Directories”
property. In this case, the path was
“C:\SpinCore\PBDDSIV\lib”.
- Click “Apply.”

| Figure
6: Visual C++ Property Pages |
3.4 Adding Library Dependency
Now the dependency on “pbddsiv.lib” needs to be
added. The Property Pages should still be open.
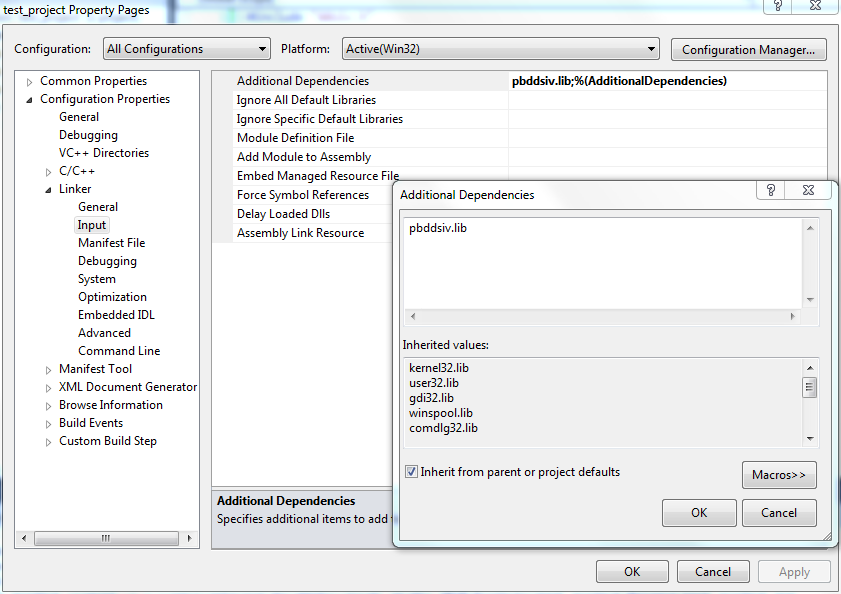
- Navigate to “Configuration
Properties > Linker > Input” in the left
panel.
- For the “Additional
Dependencies” attribute, please click once on the
field, then select the drop-down arrow and click
“<Edit>”, which should bring up the menu shown
in the figure below.
- Enter the name of the
library, which in this case is “pbddsiv.lib”.
- Press “OK.”
- Press “OK” on the Property
Pages window.

| Figure
7: Visual C++ Additional Library
Dependencies |
4 Compilation
Now that the project has been properly configured, to
compile the project please go to “Build > Build
Solution” or press F7. If you do not want debug data
to be compiled into your executable, please select
“Release” rather than “Debug” in the “Solution
Configurations” drop-down menu on the toolbar.

| Figure
8: Visual C++ Compilation Complete |
4.1 Common Compilation Issues
- The Visual C++ C compiler
requires that all variable declarations occur at the
beginning of a block. If this convention is not
obeyed, Visual C++ will usually give errors about
undeclared variables.
- Sometimes code that will
compile in another compiler (such as GCC) will
require additional includes for functions that are
implicitly defined (e.g.: “system()” requires
“stdlib.h”). This will give a warning at compile
time.
|


